Thursday, December 16, 2010

Solar Decathlon Group Design (Wicket)

Introduction

          This is the final assignment and group project for the semester. Our task is to create an actual web application of our Balsamiq Mockup that we did earlier in the semester (Mockup post can be found here). The idea of the project is to create a new version of the mockup using HTML, Blueprint CSS and Wicket. The task asked for a more real look and feel of the Home Management System for Team Hawaii's house entry in the 2011 Solar Decathlon.

The Project

          The project itself was like a roller coaster ride. Since we decided to choose my original design, I volunteered myself to take the challenge of creating the Base Page for the whole application and follow the original design. This gave an opportunity to hone my skills in designing and creating graphics and icons using Photoshop and I had fun doing it. Even though we have been learning Wicket for the past couple of weeks, it is still the most frustrating part of creating the web application in my own opinion. But I also found one advantage of using framework such as Wicket beside from learning JAVA. It allows us to create web applications without the need of an actual web server. It is also much easier to share the whole project trough a jar file or creating distributions. 
          The design of our web application changes as we slowly finding out some holes in the original design. One example is the navigation icons, which is originally placed vertically in the left side of the page. First, the placement is not very user friendly. The user have to browse all the way down the page to click the other icons and get to the other page. Second, this created a very restricted space for the content of the pages. If we have a small content in a page, there will be a big empty space below it. We decided to change this and moved the navigation icon on top of the page. This allows the user to see all the icons and made the pages re-size dynamically according to the amount/size of the content (See pictures below).  Our home page design also changed from being very very simple as our professor pointed out some design flaws and also after getting the feedback from Team Hawaii. We decided to create widgets of each element in the system. This allows user to quickly check the status of each entry without going through all the pages (See pictures below).
          We also ran into cross-platform and cross-browser problem. I'm doing the project on my Mac using Firefox and for some reason it did not display properly when my other group mates viewed it in their PC with Firefox. The fix to this is to put a note in the User Guide of our project saying that the web application is best viewed in PC using Firefox and in Mac using Safari.
Original Design
New Design

The Three Prime Directives of Open Source Software Engineering

          In creating the design of our project, we also need to consider whether we met the three prime directives of Open Source Software Engineering. Below are the three directives.

1. The system successfully accomplishes a useful task. - The system does not have to include every bell and whistle to accomplish a useful task. Indeed, the art of incremental development is to determine the smallest useful increment of functionality and implement that first.
          I believed that our project accomplished this directives as we created a web application that looks and feel like a fully functioning application. But what the user would say will matter the most.
2. An external user can successfully install and use the system. - The system must include sufficient user-level documentation to support download, installation, and use of the system without significant interaction with a system developer.
          We provided a documentation in out project site for user to be able to test and try out our project. I believed that it is sufficient enough to be able to say that we accomplished this directives, but then again users feedback will only verify this.
3. An external developer can successfully understand and enhance the system. - The system must include developer-level documentation providing insights into the design and development of the system that enable an external developer to understand and enhance it.
          Like the above directives, we provided documentation for the developers who wished to collaborate or check out our project. The code specially the Java files are well documented. While I believe that the HTML files could use some more cleaning up due to the fact that none of us in the group knows how to do HTML the right way.

Conclusion

           All in all, the whole project gave me more understanding of what Software Engineering is about. It all starts from the user/customer, in our case the Team Hawaii. Then we moved on to designing and creating mockup for the user to see and get feedback from. Finally the implementation which is the hardest yet the most exiting phase of Software Engineering. The whole project itself made me learned different applications, languages and technologies such as Photoshop, SVN, Project hosting, Wicket, CSS and HTML. I believe that there are a lot more room for improvement specifically on our design. We may need a lot more research and of course feedback from the user.
          The things that I wish I could have done differently is creating buttons instead of just hyperlink text in some of the pages (Security, Hvac). Also use Javascripts in some of the pages to add functionality specially in the buttons.

Download

Here's the site of our project where you can download our web application. Don't forget to read the User Guide if you want to test it out and Developers Guide to contribute, correct or even critique our project.

Tuesday, November 30, 2010

Wicket Katas

Introduction

This week's class' work is modifying Katas. Katas or specifically Code Katas are programming exercises that aims to refine ones programming skill through practice and repitition (Wikipedia).  Our class will be working on the previous exercises hoping to hone our skills in Wicket. There are 5 different Wicket Katas exercises that we need to work on and each exercise has about 1 to 3 needed modifications with the total of 11 modifications for the whole assignment. We needed to record the time that it took us to do each of these modification so let's go ahead and see how I did.

Example 01

TO DO: Kata 1A:  Add a new line to the page that says, "In one week, the time will be <time>", where <time> is replaced by a timestamp one week later than the timestamp that now appears on the page.  

RESULT: This took longer that I thought it would. There were some confusions on which method to use to get the timestamp for the next week.The original code uses Date() to retrieve the current date but the method getDate() is now deprecated so I had to do some reserching t able to do this Kata. I found the Calendar() and getCal() to do the job. This exercise took 20 mins.

TO DO: Kata 1B: Add a button to the page labelled "Refresh".  After pushing the button, the times update themselves. 

RESULT: This exercise is really easy. Just add a new button and set the onSubmit() to go the same page. This exercise took 15 mins.

TO DO: Kata 1C:  Wicket, by default, runs in "Development" mode, but production systems should run in "Deployment" mode.  Override the getConfigurationType() method so that Example01 now runs in Deployment mode.  See this page for details. 

RESULT: I was surprised with this one as I thought that this will be the hardest one. Luckily we were provided a link on the example of how to do this. This is accomplished by adding the getConfigurationType() method and setting the Application to Deployment mode. This exercise took 15 mins.

Example 02

TO DO: Kata 2A:  Add an additional link on the home page that says, "Go to image page".   Create this page, which should display an embedded image.  This image should be G-rated.  It should be in a .jpg file stored with the system, not retrieved from the web.

RESULT: All that is needed to do this is to copy the previous code and replace the label to create another link. Creating the page wasn't that bad either and for the image, It didn't took that long as I had to do this in the previous week's exercise. This exercise took 20 mins.
TO DO: Kata 2B:  Add a button on the home page with the label, "Make font bold".  After the user pushes it, all the text on the page should become bold, and the button label should change to "Make font italic".  When the user pushes that button, all of the text should change to italic and the button label should change to "Make font normal".  Pushing that button changes the text back to its original state and the button label should now say "Make font bold".

RESULT: This is the HARDEST of all the exercises. I worked on this for about 30 mins and decided to skip on this exercise. I had a couple of ideas on how to this. One of them is to create two additional pages. One page has all fonts in italic and another with all fonts in bold and links each buttons to the corresponding page. I'm not sure if this is even allowed or if this is a proper solution for this so I decided to do the very hard way. I created function that uses a switch statement to select the button's name. For the font type, I created if statements in the onSubmit() method. This will change the opening and closing font tag depending on what button was press. I had to ask for a lot of help on this one. The result is the initial button name is empty but when press, the button appropriate names will show up.This exercise took 4 hrs in span of three days. 

Example 03

TO DO: Kata 3A: Add a new tab called "Image" that takes the user to a page containing an embedded image (your choice, G-rated).  It should be in a .jpg file stored with the system, not retrieved from the web.

RESULT: This is pretty simillar to KATA 2A so this is one of the easiest. The only difference in here is that the page extends the BasePage, which has all the tabs. This exercise took 10 mins.

Example 04

Record how long it took you to accomplish each of these katas.
TO DO: Kata 4A:  Add a new cheese called "Velveeta", which costs $0.25/lb. 
RESULT: We chose this exercise to work on in class so I had help in finishing this. We base the code for this on the already existing entries. This exercise took 10 mins.

TO DO: Kata 4B:  Add a "country" field to the billing address that appears when checking out.   The country field should provide a drop-down menu with a selection of 5 countries.

RESULT: The same with the previous exercise, I had help to do this. The coding part was the easy part, but looking for the place on where to put it was the harder part. We had to configure 4 different files to accomplish this. This exercise took 15 mins.

Example 06

TO DO: Kata 6A:  Get rid of the blue columns that appear when displaying the website. These are for development, not deployment purposes.
RESULT: This is probably the easiest exercise. I had to first figure out where the blue columns are being created then where it's being called and then remove it from there. This exercise took 5 mins.

TO DO: Kata 6B:  Place the image underneath the form, not to the right.
RESULT: This is also an easy exercise. At first I tried to add a line break right after the form, but that didn't do anything. I played with some more and found out the span tag and replaced 16 to 20. This exercise took 5 mins.

TO DO: Kata 6C:  It is often convenient for web applications to consult a properties file when starting up in order to get configuration values.  An easy way to do this is with the standard Java Properties mechanism. For this Kata, modify your Example06 system to read in a file (if present) located in ~/.example06/configuration.properties.   (Note that ~ means "the user's home directory", and that there is a System property in Java that provides this value.)  This property file should contain a line like the following: deployment = true
In other words, it contains a property called "deployment" whose value is true if the Wicket application should run in deployment mode, otherwise the application should run in development mode (see Kata 1C). 
Your application should read in the properties file and set the System property wicket.configuration before starting up Wicket. The Jetty class is a convenient place to do this processing.
Finally, your application should write out a message on startup indicating whether or not it found the file, and what the resulting configuration mode will be.  If the file is not found, or the property is not present in the file, then the application should run in development mode.

RESULT: This is one of the hardest exercise in the whole assignment. This similar to Kata 1C, but this needed a lot more work to accomplish. This includes looking and reading from a file, catching exceptions and setting the Application properties. I was lost on how to accomplish this so I had to ask for some help. This exercise took 1 hr and lots of questions.


All in all, most of these exercises are pretty fun and easy to do and some are very frustrating that makes me wonder if it's worth a couple of hours to do. Luckily there are plenty of help so that made it ok. These exercises got me a little more comfortable on working on Wicket.

Downloads

Below are the finished distribution for all the exercises.


Wednesday, November 17, 2010

Wicket Chart (Google-O-meter)

Introduction

In addition to our group solar decathlon design mockups, this week, we also have to create a web page application individually. We are to implement a one page web application that provides two components: a form that accepts a variety of parameters along with a submit button that when pressed, generates a GoogleOMeter visualization.  Click here for an example of GoogleOMeter.

Web Application

The form should allow the user to set the start and end of the Y axis, the title, the width and height of the chart, and  the data value for the pointer. Our web application should use Wicket, Blueprint CSS for layout, the class' build system. We also need provide at least one useful test case and employ sessions so that multiple users can generate charts independently.

Wicket Experience

I was excited about learning Wicket. I just started  creating web pages and web application from my internship and I thought that Wicket will be very helpful in the future. I had to relearn HTML and then learn PHP, CSS and Javascript on my own to be able to do our previous project.  It turned out though that Wicket was harder than I thought. Setting the pages alone took me more than an hour. Since I never seen any Wicket code in action before,  I had to reuse the example Wicket project that were given to us by our professor and then work from there.
I have to say that creating web application/pages using Wicket is a very long and complicated process. The only thing I like about Wicket is we were able to work and enhanced our skill in Java. The only advantage that I can see about using Wicket is a high quality web application due to the fact that we are using build system to create it.
My over all experience in Wicket is not bad, because I get to learn a new framework and also enhance my skill in writing Java.

Wicket Chart Web Application

Below is the finished product for the implementation of the web application for creating Google O Meter chart. Beside from spending most of the time getting use to Wicket, I also spend most of my time making my page attractive by creating images for the header and the footer. I had fun creating this page and there are a lot more room for improvements.

 
Lesson Learned

Creating web application is very hard and  frustrating at first, especially when using a framework for the first time such as Wicket. It is very rewarding though once you see the result and it makes you want to learn some more.

Download

My Wicket chart can be downloaded here.

Solar Decathlon Group Design Mockup

     Our class' first group project is about creating a mockup web application design for the home management system for the Team Hawaii's entry for Solar Decathlon 2011. The project itself is really interesting because it forces members of this projects especially students to be as innovative and creative as they can. This is the second mockup that I did for the same system. The first one was individual which I thought was I bit harder than the group project. This mockup is a lot easier as three students are working together. I can give and get ideas, opinions and help to/from other members of the group. We used Balsamiq Mockups to create our design, Google chart wizard to represent data and myself personally used MS Visio and Photoshop to add some kick on some of the graphics. We are to design user interfaces to monitor and/or control lightning, HVAC, energy generation and consumption, aquaponics, security and entertainment. While we worked together on some of the pages, we also assigned to create designs individually for different pages. Below is my design for the security page.


This page utilizes the current floor plan to show which part of the house needed attention for security and intruders' position if there's any. It also have security cameras which are triggered by the already existing motion and infrared sensors.
     I also designed the homepage but I spend most of the time designing the Aquaponics page. It's the most interesting one for me, not only designing the page but the system itself. It utilizes the use and reuse cycle. I'm so interested on Aquaponics that I might create one at home. Anyway, my page monitors different levels for the whole system. PH level, Oxygen level and water temperature are all essential for the fishes' health, while the fish tank and plant bed's water levels are to ensure that the whole system is running properly. The idea is to monitor all this in real time so I decided to use gauges and a digital counter to represent data.  When something goes out of the normal levels then an alert and some recommended instructions to fix it will show up on the status field. Below is my design for the Aquaponics page.

Thursday, November 11, 2010

Team Work and Project Management

Introduction

To work on the solar decathlon design mockups, the class was divided into groups of three to four students. I was paired up with Kylan Hughes and Chuan Hung. We started to talk about our design and we decided to use my previous mockup as a template for our group project. We used Google Project Hosting and SVN for our version control. 

Team Work

Since we needed to create about 8 to 12 page design mockups, we decided to divide pages that we are going to work on. We chose the pages that we really knew about. Like for example, my "Security" page design was pretty much the ideal design that we are aiming for, so I was the one who worked on it. We met multiple time just to talk about what we needed to finish, asked for others input and for help too and the rest are through email. We really didn't need to meet for a long period of time as we keep each other updated just like what I mentioned through email and through the job updates and commits on the project hosting site.


Google Project Hosting 

I have to say that Google project hosting was a huge help in finishing this project. We didn't really need to be at the same room to fully work on our project because we could just upload/commit our own page into the server and the whole group could check on it. I also have to say that we have to be careful in using this and the subversion control as it could mess up any changes made by other group member if I commit the whole project. We just have to remember to "Update" first before committing anything else. Below is our Google Project Hosting page.


http://code.google.com/p/solar-decathlon-teamhawaii-4/


All in all, the project when smoothly and we were able to really improve our designs  because we were able to focus more on small number of pages through divide and conquer.

Thursday, October 28, 2010

User Stories

Introduction

     This week's work includes creating user stories for the Solar Decathlon for Team Hawaii. User Stories are one or more sentences that captures what the user wants to achieve. It is an informal and quick way of handling customers' requirements, features and functionality of a project that can be implemented. The user stories are written by the customers for a software project and are their main instrument to influence the development of the software.
     Solar Decathlon is a competition that was created by U.S. Department of Energy that challenges 20 collegiate teams around the world. The teams were challenge to design, build, and operate solar-powered houses that are cost-effective, energy-efficient, and attractive. The winner of the competition is the team that best blends affordability, consumer appeal, and design excellence with optimal energy production and maximum efficiency. For more information about the Department of Energy Solar Decathlon click here and for Team Hawaii click here.


User Stories

      Based on the Team Hawaii's presentation and question and answer portion of it, below are the user stories that I thought occupants of the house may require on the management system:

1. As a home occupant, I want to be able to monitor both the energy that my house produces and the energy that the house consumes. 

2. As a home occupant, I want the system to do calculation and some kind of notification if my house's produced energy will be not enough for the current house's consumption for the rest of day.

3. I want the system to give me the summary of the energy consumption of each electrical appliances/equipment, specifically which one consumes the most. The system will also suggest which of these appliances should I turn off or unplug to be able to save energy.

4. As a home occupant, I want to be able to see my house's current temperature. In this way I would be able to tell whether the cold and warm air valve is working properly, if not, then I would be able to do necessary adjustments. This would keep my house very comfortable during hot summer or cold winter.

5. As a home occupant, I want to use LED lights all over the house and be able to control everything wherever I am in the house. This would make it very easy and convenient for me. This would also help save energy by immediately turning the lights off when not used.

6. To conserve even more energy, I would also like that the LED lights would turn whenever I'm around. By using IR and motion sensor, an array of LEDs would turn on and follow me wherever I go in the house. This also has to work with multiple occupants in the house.

7. To fully make my house self sustained, I want to utilize the new technology in growing food called Aquaponics. I want to be able to control and monitor the acidity and chemical level the Aquaponics system. This would make it very convenient to oversee and maintain the food growing system.

8. For entertainment, I want the existing LED lights installed in the whole house to be able to function as a visual effects on the playing music. The lights would need to dance base on the music that is currently playing. This would not only add cool points but would also keep my guests busy and entertained.

9. I want all functions and requirements above integrated if not in one system then in one device like a tablet, PC or smart cellphone or both. I want the interface to be easy to understand and easy to use, portable and convenient.

10. Because of the systems functionality, I want the whole system to be  secure especially from outside interference that may pose threat to the safety of the system and the house. I want to utilize the existing hardware that comes with the system to function as security device/alarm not only inside the house but also on its perimeter. My house would not only be very convenient and comfortable to live in but would also be safe and secure.


Tuesday, October 26, 2010

Website Usability

Introduction

     Website usability is this week's topic for our class. It is defined as the ability of a website to provide a well-designed user interfaces that targets the ease-of-use for its users. Usability itself is defined as the study of ease of use, of how quickly a user learns to use a particular human interface. It is defined in five different components:
  • Learnability: The ability of a product to enable users to quickly learn how to use it.
  • Efficiency: The ability of a product to enable users to how quickly can they perform tasks.
  • Memorability: The ability of a product to enable users the ease reestablishing proficiency.
  • Errors: How many errors do users make, how severe are these errors, and how easily can they recover from the errors?
  • Satisfaction: How pleasant is it to use the design? 
   Usability is very important not only to website but also in designing different products. If a website is giving a user a hard time to use, it is pretty much useless. The same thing with different products, if the users can't figure out how to use it, he or she will trash or returned it, therefore results into lost of clients/customers.

Examples of websites that have satisfactory usability:


     The homepage of this website pretty much tells you everything about this product and it all fits in your screen without scrolling up and down. It tells you what the product is, why use it and how to download it, and this is only on the first page. All in all, this is a very straight forward page. You don't have to visit other parts/links of the website to find out what the product is all about unless you actually interested in it.


     SpeedTest.net is a website that tests both the download and upload speed of your internet connection. As soon as you go to the site (1st pic), it automatically finds your location.  The only step that you need to take is click on the "Begin Test" and off you go. After testing, it'll show you the results (2nd pic) nicely and easily. The use of this product is very straight forward and effortless.

Examples of websites that have unsatisfactory usability: 


     Although the site and product is really straight forward (just type the location or bus stop and go), it doesn't handle typos very well. A missing single letter on a location will immediately return an error or no result. This will be very frustrating for users who are not familiar or having problem remembering street names here in Hawaii. Not very tourist and elderly friendly.


      This whole website is pretty simple, too simple that is. The homepage is just one big advertisement, which I'm guessing a PDF file from the company's weekly newspaper ad. All the pages here are static. It doesn't give you ability to search for products. It gives you some categories, but it only list different types of product and that's it, nothing specific about the products available.

Wednesday, October 13, 2010

RoboHosting

     Version Control and Configuration Management is the topic for this weeks class. To learn further on this topic, we had to download an SVN client which is a a revision/version control software. It is used to download, edit and commit changes on a project from an open source subversion host. Speaking of a subversion host, we used Google Code to create our own project host. Below are the tasks that we had to do and I completed.
  • Download and install an SVN client. Since I'm using a Mac, I had to download and install SmartSVN which is  an open source and free to download. I was surprised that the installation of this program went pretty quickly and smoothly.
  • Checkout/modify/commit an existing system hosted at Google Projects. We had to download the existing robocode program from our professor's project, modify it and commit the changes. Since the whole class is doing the same thing on the same project, we had to make sure that the program is successfully build using "ant -f verify.build.xml" after it was downloaded from the host and before I commit changes and upload back into the host.

  •  Create a new system hosted at Google Projects. This part of the task was pretty easy but there's a lot of work. I created an account  in Google Code to host my own project - robocode-ert-SpamMusubi. Additional tasks includes creating a discussion board (Google group), create a User Guide, Developers Guide, and add Committers into my project. All this were accomplished.
     I can see this newly acquired knowledge very very useful especially to classes that require group work on a programming class. Come to think of it, this is what exactly I need at work. This will help us to control and track the changes that we created on our company project.
Link:
Robot SpamMusubi Google Project 

Friday, October 8, 2010

RoboTesting

For this week's assignment, we were to create JUnit test cases for our Competitive Robot that we created (see previous post). We were to create different test cases such as behavioral and acceptance tests.

 The Easy Tests

The acceptance test is the easiest to create due to the sample code that was provided to us. This test checks how good or bad your robot is against other robots like the ones in the sample robots. I tested my robot against SittingDuck robot and should win a 100 percent of the time. I also tested my robot against Tracker, but for some reason it is giving me some confusing resultss. I built my robot to win against Tracker atleast 80 percent of the time, and it has been proven when I run it using Robocode. For some reason on the JUnit test, my robot can only win once at the most so the test case that I made keeps failing. I decided to choose another robot that I can compete with mine. Embarrassingly I can't beat any other robots so  I chose Target as my next test case which is pretty much like Sitting Duck.

The Hard Tests

The behavioral test was probably the hardest for my robot since my robot doesn't have any specific movement to follow unlike the Walls robot. My robot follows and moves parallel to its enemy this makes it hard to create a test for this specific behavior. It also moves into the center when it gets near corner. This particular behavior is the only clear and easiest test that I've created. I also created a test case the checks if my robot hits the wall and move on the opposite way. The hardest that I test case that I created is testing the fire power used by my robot. Depending on the its distance against the other robot, it fires a certain bullet power.  

Jacoco Coverage

The Jacoco revealed 96% coverage for my program. The other 4% were "if" cases in my main robot code that was not used upon running the program.

Conclusion

I feel that I could have done better in choosing test cases for my robot. Also my robot needs lots of improvements so it can easily be tested. I need to improve the way my robot moves and fires as it can only beat the stationary robot. Maybe create more predictable or patterned movements so it is easy to create behavioral test cases.

Below is the current distribution of my robot.

Download: RiceMusubi

Thursday, September 16, 2010

Competitive Robot: RiceMusubi

Overview
          After learning basics movements, targeting and strategies on previous Robocode assignments,  I created my own robot that will hopefully outlast the sample robots (Walls, RamFire, SpinBot, Crazy, Fire,  Corners, Tracker, SittingDuck) in the Robocode. This would help my robot to prepare in the coming competition in class. Below is the summary of my robot's design strategy.

Design  

Movement  
          The basic strategy for movement is just to keep on moving. It is evident from the sample robot, specifically the sample Walls robot that not staying on one place and moving in a certain distance would be very effective in dodging enemy bullets. When my robot finds and enemy, it moves its body parallel to the enemy and will 150 pixels forward but will try to maintain its position parallel to the other robot. This movement sometimes results to my robot circling around the other robot and effectively dodging the enemy's fire. In an event that my robot hits the wall, it will run towards the center of the battlefield to avoid getting cornered. And will then do its original movement.

Targeting
          For the targeting strategy, I adapted my previous robot's behavior- Boom04. It scans the nearest enemy robot and it uses its gun to keep track of that robot. The idea is to keep the gun pointing towards the enemy at all times. To be able to do this, I need to make sure that the gun and the body of my robot are able to move independently.

Firing
For the fire power, I adapted the behavior of my previous robot (Boom03), which uses its distance from the enemy to figure out how much fire power the bullets should have. The nearest the enemy, the highest the fire power will be use. As soon as my robot found another robot, it'll start shooting and will keep shooting.
    Results

              To be able to test my robot against other robots, I used the sample robots that are available in the Robocode program. Below are the results of the test.

    vs SittingDuck:
              This is a no competition, as this robot doesn't do anything. Any robot that can target and fire would win against this robot. My robot won 100% of the time.

    vs Fire:
              This robot is a pretty hard opponent against my robot. Although my robot moves a lot, the Fire robot was able to hit it a couple times before it could get away because of the number of bullets this robot fires at a time. My robots has a big disadvantage because it can only fire after it moves while this robot just sits and can keep firing. It only moves when it gets hit which makes it a hard target since my robot fires on its opponents previous position. My robot won 41% of the time.

    vs Corner:
              This robot is similar to Fire, the only difference is  this just stays in the corner and never moves. It is much easier target. My robot won 58% of the time.

    vs Crazy:
              This robot is a very hard target for my robot. That only weakness of this robot is it doesn't fire as much. It is also worth mentioning that this robot extends AdvancedRobot. My robot won 48% of the time.

    vs Tracker:
               This is a perfect opponent to show off my robots agility. My robot pretty much dodge every bullet the this thing throws. My robot won 64% of the time

    vs Spinbot:
               Similar to Tracker, my robot just pretty much dodge every bullet this thing fires. Its only advantage is it uses the maximum amount of fire power every time it fires. This is also another advanced robot. My robot won 60% of the time.

    vs RamFire:
              This is very hard to beat for my robot. My robot lost only because of the damage it cost when it rams and is pretty much dead when cornered. My robot won 35% of the time.

    vs Walls:
              My robot never had a chance on this robot. This is the robot to beat, that's why most of the other students based their robot from this. It's a very hard target. My robot never won a round.

    Conclusion
              Robocode is easiest and best way to learn programming. It not only teaches me but it also showed me that programming could be fun too. This experience thought how to be really a better programmer. It thought me read and understand APIs which. It made realize that programming takes time and I better start doing it earlier to be able to create and develop a better program. All in all, this assignment is really fun, ans I might actually like programming now. 

    Download:
     RiceMusubi Eclipse Package
     RiceMusubi robot jar file

    Tuesday, September 14, 2010

    Robocode

    For the third programming assignment in ICS 413, we were asked to write codes for 13  different robots all having different behaviors. We used an open source programming game called Robocode. Its main goal is to create a robot/tank using java and battle against other creators and developers. It is more than a programming game since it also teaches users java programming.

    The installation of the program is pretty straight forward. It has tutorials on how to develop robots using Eclipse, which helped a lot since we're already familiar with it. The program itself can be found at http://robocode.sourceforge.net/ and tutorials  in this comprehensive wiki among many others available online.

    Here are the following robots that we have to develop:
    • Position01: The minimal robot.  Does absolutely nothing at all.
    • Position02: Move forward a total of 100 pixels per turn.  When you hit a wall, reverse direction.
    • Position03: Each turn, move forward a total of N pixels per turn, then turn right.  N is initialized to 15, and increases by 15 per turn.
    • Position04: Move to the center of the playing field, spin around in a circle,  and stop.
    • Position05: Move to the upper right corner.  Then move to the lower left corner.  Then move to the upper left corner. Then move to the lower right corner.
    • Position06: Move to the center, then move in a circle with a radius of approximately 100 pixels, ending up where you started.
    • Follow01: Pick one enemy and follow them.
    • Follow02: Pick one enemy and follow them, but stop if your robot gets within 50 pixels of them.
    • Follow03: Each turn, Find the closest enemy, and move in the opposite direction by 100 pixels, then stop.
    • Boom01: Sit still.  Rotate gun.  When it is pointing at an enemy, fire.
    • Boom02: Sit still.  Pick one enemy.  Only fire your gun when it is pointing at the chosen enemy.
    • Boom03:  Sit still. Rotate gun.  When it is pointing at an enemy, use bullet power proportional to the distance of the enemy from you. The farther away the enemy, the less power your bullet should use (since far targets increase the odds that the bullet will miss). 
    • Boom04: Sit still.  Pick one enemy and attempt to track it with your gun. In other words, try to have your gun always pointing at that enemy.  Don't fire (you don't want to kill it). 
     I expected these assignment to be programming intensive but I didn't expect math to play a role in this. I never had trigonometry for more than a decade so I had to brush up on it before I even touch the keyboard. Position04 is the first challenging robot to develop. I had to relearned Pyhtagorean theorem. Here are the pseudocode for this robot:
     
            1. Get the coordinates of the center of the battlefield
                 -this requires to get the width and length of the battlefield and divide each by two.
            2. Get the position of the robot and subtract from the given x & y coordinates
            3. Use Pythagorean theorem to find the angle to the destination the robot should turn.
           4. The use Pythagorean theorem again to compute the distance to the destination.

    But wait there's more.......

    I also need to figure out which quadrant the robot is at to be able to compute how much it need to turn the robot to face the center and then go forward. 

    The Boom01 trough 04 are probably the easiest set of robots to develop. This are also the most fun part, because I get to fire at the other robots. The whole Eclipse package of my work can be download here.

    All in all, this assignment reminded me on how fun and frustrating programming is. It's fun when you were able to see the finish program, but it's guaranteed that you will have lots of frustrations to get there and see your creations comes alive. It also reminded me that robots are very cool, but useless without humans. With the help of these robots, now I can get started with my competitive robot and test its ability with others.....

    Tuesday, August 31, 2010

    OSS Experience: Automatic JUnit Creation Tool

    Overview

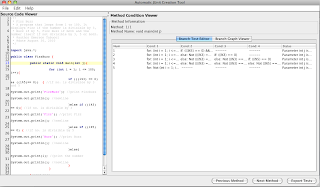
                The Automatic JUnit Creation Tool analyzes java classes to map all possible test branches. The tool has a wizard that guides users through the generation of a JUnit test. This tool is very helpful to programmers who's new to JUnit. It helps user to focus more on the test cases for their program rather than spending more time figuring out how to create a test program. This tool generates a JUnit code that can either save or copy and paste.


    Creating JUnit for FizzBuzz Program with JUnit Creator (version 1.25).

     The Generated JUnit code for Fizz Buzz Program

    Primitive Directive 1

                This program is very simple yet very useful and helpful. It eliminates the needs for writing a test program from scratch, which come in handy for busy programmers. The wizard covers all options that you may want to include in your test program. 
                The user interface is simple, with your program on left side and the conditions and execution paths on the right.
    Automatic JUnit Creator (version 1.26).

    Primitive Directive 2

               The size of the program is 7.5 mb, which make it easy to download and is available for multiple platforms such as Windows, Mac OSX, Linux and other. The package includes the library, readme and sample programs that can be use to demo the software. It requires no other configuration on the user’s computer. It can be either run by clicking the .jar file or through the terminal.
                There are two version of the program- 1.25 and 1.26. The version 1.26’s user interface is simpler with less buttons to click, but it lacks the documentation. The 1.25’s documentation is well written with step-by-step instructions and graphics in PDF format.

    Primitive Directive 3

                The developer-level documentation is available in the software’s homepage. It includes the design overview that shows the packages and technologies it uses and includes the link for other information and sources about the program. 
                The author includes an instruction on how to setup the Development Environment, which uses Netbeans. The author also allows others to contribute and write into the software’s repository granted with his permission. 

    Monday, August 30, 2010

    Fizz Buzz Program

    When I first read about writing the Fizz Buzz program, I got worried. I never wrote a Java program for almost 2 years. It took me about 45 minutes from the moment I opened Eclipse, writing the comments and getting the write results. Most of the time though were spent figuring out on how to get started on writing a java program. I had to search for my previous java assignments just to get an idea on how I used to write it. 

    The program below is what I came up with. It's not very robust and as good as other programmer would do it, but it works. 

    It was fun writing the code for this program mainly because it was very simple and I'm not expecting the same for the coming programs that need to be coded.  

    /**
    * Fizz Buzz
    * A program that loops from 1 to 100. It displays Fizz if the number is divisible by 3,
    * Buzz if by 5, Fizz Buzz if both and the number itself if not divisible by 3, 5 or both.
    * @author Emerson Tabucol
    * @date August 30, 2010
    */

    import java.*;

    public class FizzBuzz {
      
      
    public static void main(string[] args){
          
          
    for (int i = 1; i <= 100; i++){
          
              
    if (((i%3) == 0) &amp;&amp; ((i%5)== 0))  { //if no. is divisible by 3 and 5
                  
    System.out.print("FizzBuzz"); //print Fizzbuzz
                  
    System.out.println(); //newline
              
              
    }else if ((i%3) == 0){ //if no. is divisible by 3
                  
    System.out.print("Fizz"); //print Fizz
                  
    System.out.println(); //newline
                  
              
    }else if ((i%5) == 0) { //if no. is divisible by 5
                  
    System.out.print("Buzz"); //print Buzz
                  
    System.out.println(); //newline
                  
              
    }else{
                   System.out.print
    (i); //print the number
                  
    System.out.println(); //newline
              
    }
           }
          
       }
    //end main
    }//end class